前言:本篇小白入门介绍是紧接着上一篇继续的,在写天气预报的练手项目时,需要画个简单的table用来选择查看城市天气详情的东东,于是简单的研究了一下iOS关于UITableView的实现,还是老规矩,废话不说,先上UITableView的实现demo:
标注一下demo源码位置iOS Objective-C使用UITableView实现可上下滑动table功能
简单介绍
简单来说,table view就是在单个列里面显示一组列表项,UITableView继承于用户可滑动表格的UIScrollView,但是需要注意的是UITableView的只允许上下滑动。每个cell中可包含的内容可以自定义,若是你只想展示单个的文本或者其他信息,则对你来说UITableView的实现就相当简单了。具体操作如下:
构造需要展示的数据信息
关于数据信息,最好在页面加载tableView之前就构造完成,我一般会写在整个页面的viewLoad方法中,具体代码如下(使用iOS自带的NSTimeZone去作为展示信息):
声明全局变量
1@property (nonatomic) NSArray *timeZoneNames; //作为传参变量构造展示信息,并赋值给全局变量
12NSArray *timeZones = [NSTimeZone knownTimeZoneNames];self.timeZoneNames = [timeZones sortedArrayUsingSelector:@selector(localizedStandardCompare:)];
实现tableView的一些基本方法
返回 tableview 有多少个section的方法
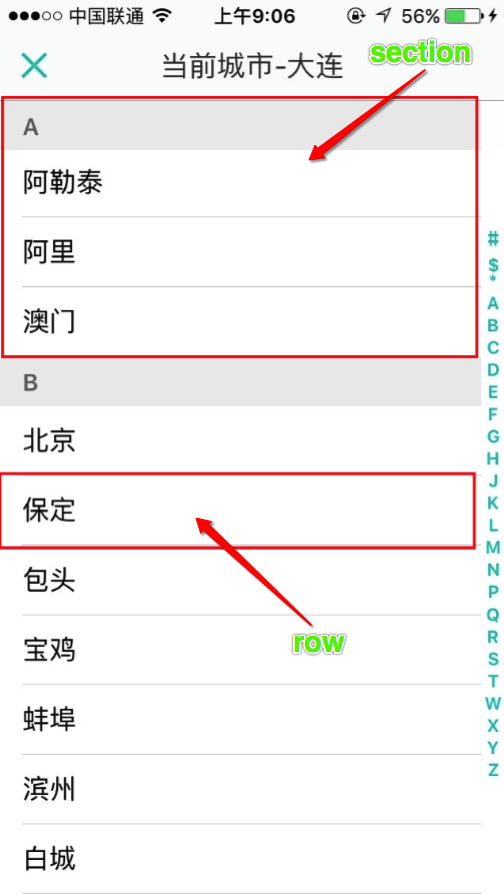
首先需要简单介绍cell与section的意义。UITableView的每一条数据对应的单元格叫做一个cell,也是UITableView的一个对象。并且我们可以分区展示UITableView,这样每个区就称为一个section,section中的每一行都从0开始编号。楼主在网上盗了一张非常清晰明了的图片,如下:
介绍完毕,上干货!!!!
- (NSInteger)numberOfSectionsInTableView:(UITableView *)tableView这个方法就是 oc 提供的用于返回tableview有多少个section的方法。设置如下:1234- (NSInteger)numberOfSectionsInTableView:(UITableView *)tableView{return 1;}ps:如果不实现该方法的话,默认返回一个section
返回section中有多少个元素,也就是有几个cell
- (NSInteger)tableView:(UITableView *)table numberOfRowsInSection:(NSInteger)section这个方法主要用于返回每个section中有几个cell
具体设置如下:12345- (NSInteger)tableView:(UITableView *)tableView numberOfRowsInSection:(NSInteger)section{// return [self.array count];return self.timeZoneNames.count;//用来统计需要显示的timeZoneNames的个数}
tableview的cell的个性化定制
完成上面两部的实现,基本上你就可以在界面上看到一个内容为空的表格了,下面就是最重要的一步:制各种个性化的 cell元素,也就是在这控制你的cell将显示成什么样子,或者在cell上展示什么信息。-(UITableViewCell *)tableView:(UITableView *)tableView cellForRowAtIndexPath:(NSIndexPath *)indexPath该方法用于返回制定的row的cell,用来个性化定制cell元素。
比如本例子中的最基础的在每个cell中返回时区内容,则需要对cell.textLable进行赋值。
|
|
按照如上的操作之后就可以实现最基础的tableview了,不过这种简单的功能肯定不能满足日常的需求,所以后面会继续介绍tableview的其他功能。
cell中添加除了text之外的信息
首先要在Controller里实现两个delegate
1、分别是UITableViewDelegate和UITableViewDataSource,并且将UITableView对象的delegate设置为self
2、创建UITableView并添加到属性中1@property (nonatomic, strong) UITableView *tableView;3、在viewDidLoad函数中,添加两个delegate的声明与赋值
12345678- (void)viewDidLoad {[super viewDidLoad];self.tableView = [[UITableView alloc] initWithFrame:CGRectMake(0, 0, self.view.frame.size.width, self.view.frame.size.height) style:UITableViewStyleGrouped];self.tableView.delegate = self;self.tableView.dataSource = self;self.tableView.backgroundView = [[UIView alloc] init];[self.view addSubview:self.tableView];}构造数据
一把我的习惯是把所有的数据构造写在viewDidLoad中,比如本次需要用到的图片以及数组
1、首先创建连个全局变量
12@property (strong,nonatomic)NSArray *array;@property (strong,nonatomic)NSArray *arrayImage;2、在viewDidLoad函数中构造数据
12345678910111213141516NSArray *cityList = @[@"北京",@"上海",@"天津",@"杭州",@"武汉",@"南京",@"石家庄",@"深圳",@"广州",@"重庆",@"连云港"];NSMutableArray *arrayValue = [[NSMutableArray alloc]init];NSMutableArray *arrayImageValue = [[NSMutableArray alloc]init];NSInteger cityNumber = cityList.count;for (NSInteger i = 0; i< cityNumber; i++){NSString *string = cityList[i];NSString *value = [NSString stringWithFormat:@"%@",string];NSString *imageName = [NSString stringWithFormat:@"image%ld.png",i];UIImage *image = [UIImage imageNamed:imageName];NSLog(@"imageName == %@",imageName);[arrayValue addObject:value];[arrayImageValue addObject:image];}self.array = arrayValue;self.arrayImage = arrayImageValue;个性化定制cell
数据构造完成后就需要在上面提到过的个性化定制cell的函数中赋值
12345678910111213-(UITableViewCell *)tableView:(UITableView *)tableView cellForRowAtIndexPath:(NSIndexPath *)indexPath{UITableViewCell * cell =[tableView dequeueReusableCellWithIdentifier:@"myCell"];if(!cell){cell =[[UITableViewCell alloc] initWithStyle:UITableViewCellStyleDefault reuseIdentifier:@"myCell"];}cell.imageView.image = [self.arrayImage objectAtIndex:[indexPath row]];cell.textLabel.text = [self.array objectAtIndex:[indexPath row]];cell.selectionStyle = UITableViewCellSelectionStyleNone;return cell;}
添加cell被选中后的响应事件
- (void)tableView:(UITableView *)tableView didSelectRowAtIndexPath:(NSIndexPath *)indexPath函数是用户选中某个cell的时候的回调函数。
1、设置cell的选中事件,首先需要设置tableview的一个属性为可以select才行
|
|
2、实现选中某个cell后的操作,本实例中主要实现了一个Alert,具体代码如下所示:
|
|